Full Screen Interface
Manage pxShield from an SSH session with its full screen interface: blocked requests, false positives, WAF rules per site, exclusions, bypass IPs, trusted proxies, cache, server settings and license. The way to manage the WAF on a server without a control panel.
On a server with cPanel you manage pxShield from its WHM plugin. On a server without a control panel — nginx, Apache or Caddy on plain Linux — you manage it from the terminal: the pxshield command opens a full screen interface over SSH, with the same settings the WHM plugin has. It comes with the pxshield package, so every server has it, with or without a panel.
Opening it
Connect to the server over SSH as root and run:
pxshieldIt must run as root, and the pxShield service must be running (systemctl start pxshield). Press F10 or q to quit.
The screen is built for a terminal of at least 80 columns and 24 lines, and it adapts to a larger one. Every change you make is saved right away; there is no separate “save” step.
Moving around
The interface has five screens. Alt+1 to Alt+5, or the View menu, switch between them:
| Key | Screen |
|---|---|
Alt+1 |
Summary: the state of the WAF and the latest blocked requests |
Alt+2 |
Blocked requests: every request the WAF stopped, with a filter |
Alt+3 |
Sites: the websites of the server, and for each one its rules, exclusions, bypass IPs, proxies and cache |
Alt+4 |
Server: the settings of the whole server, and the restart of the service |
Alt+5 |
License |
These keys work on every screen:
| Key | What it does |
|---|---|
F1 |
Shows the keys, with the ones of the current screen |
F5 |
Refreshes now (the screens also refresh by themselves every few seconds) |
F9, or Alt and the first letter of a menu |
Opens the menu bar: Alt+F File, Alt+V View, Alt+H Help. The arrows move through the menus, Enter runs an item, Esc closes |
Esc |
Closes a menu or a dialog, or goes back from a request or a site |
F10 or q |
Quits |
The bar at the bottom always shows the function keys of the screen you are on. Actions that weaken the protection — switching a rule off, removing an IP, restarting — ask first; the dialog starts on Cancel, so pressing Enter by mistake does nothing.
The mouse works too: a click on a menu, a key at the bottom, a button or a tab runs it; in a list, a click selects a row and a double click opens it; on the Summary, a click on a line or on a request opens its screen. To select text with the mouse, hold Shift.
Summary
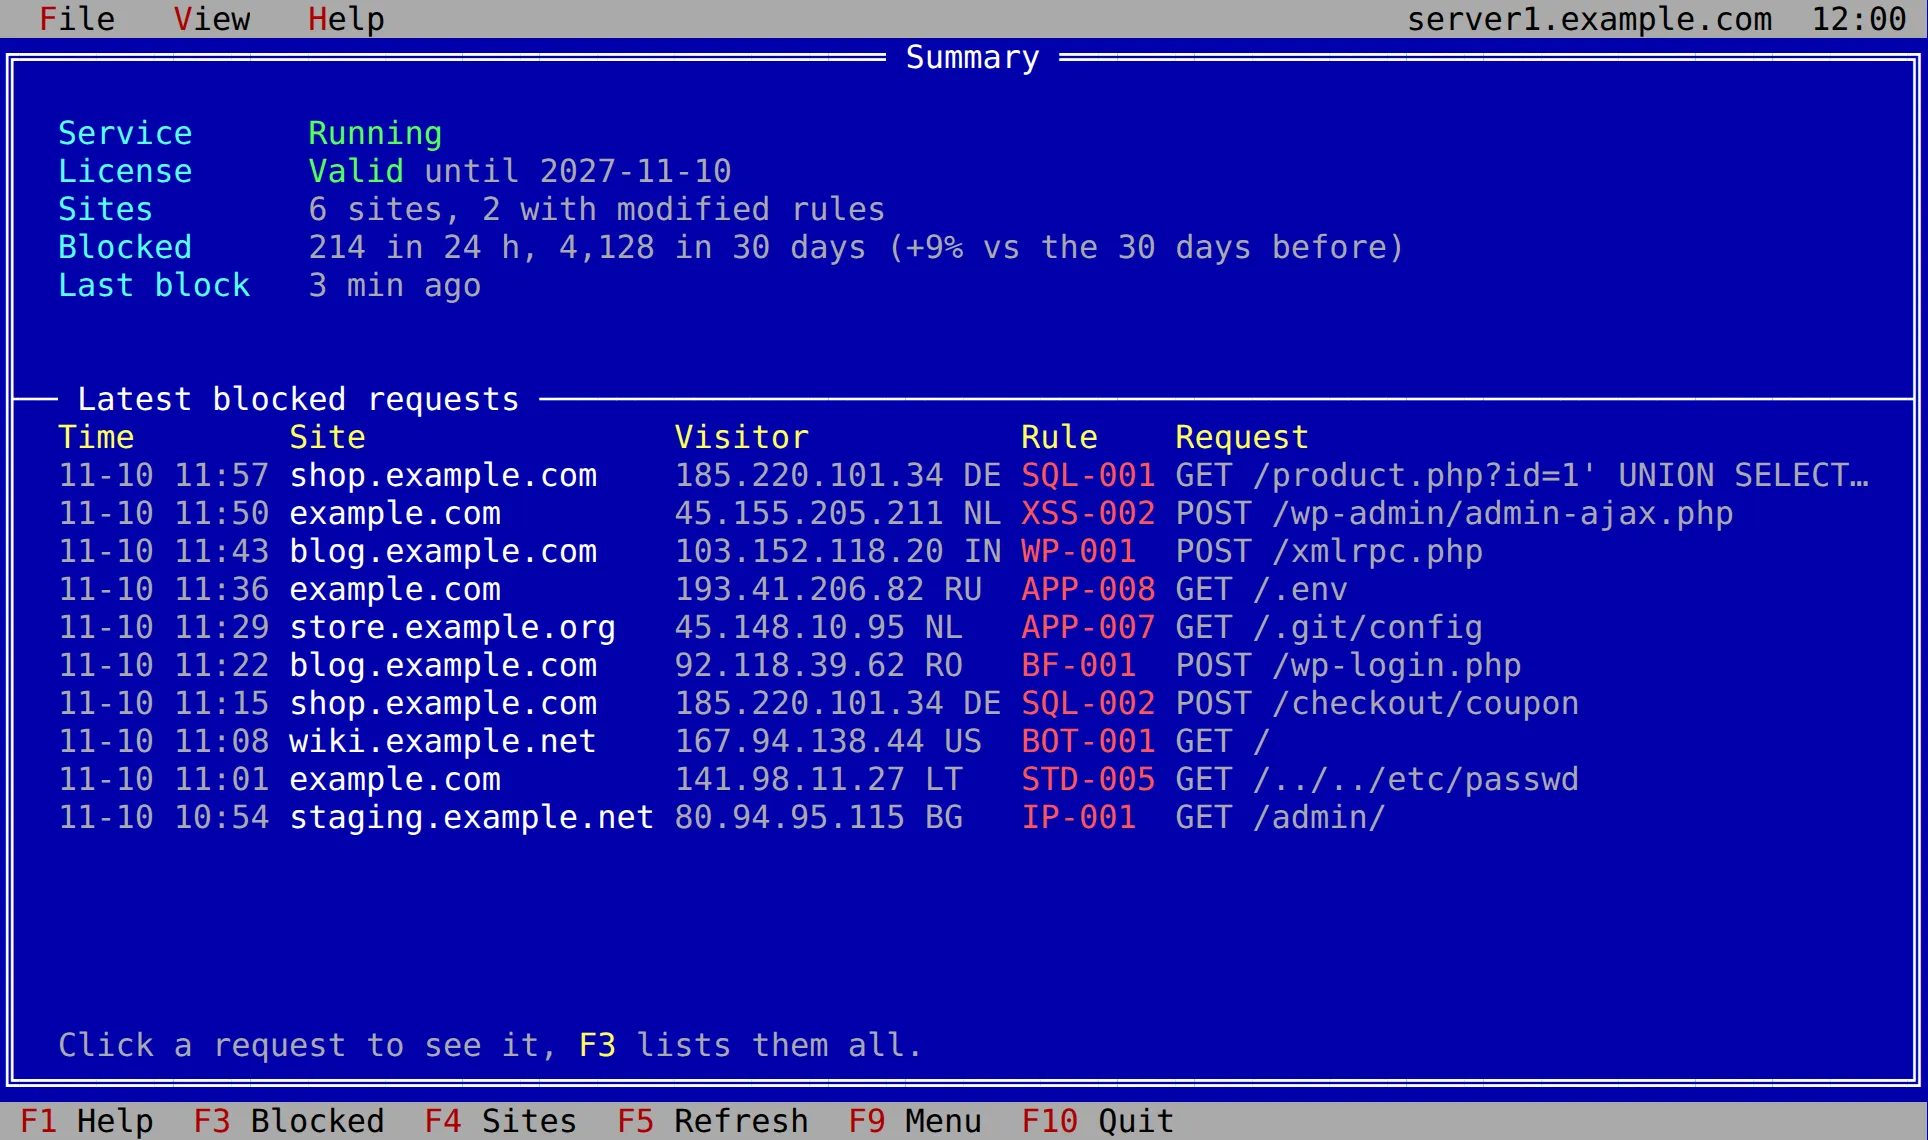
The Summary shows whether the service is running, the license, how many websites pxShield protects (and how many have rules that differ from the defaults), the requests blocked in the last 24 hours and the last 30 days compared with the 30 days before, and when the last one was blocked. When a server-wide setting is waiting for a restart, a line says so.
Below, the latest blocked requests. Click one to see it, or press F3 to open the full list. F4 opens the sites.
If the service is not running, the Summary says Not reachable with the reason, and keeps trying every few seconds; it comes back by itself once the service is up.
Blocked requests and false positives
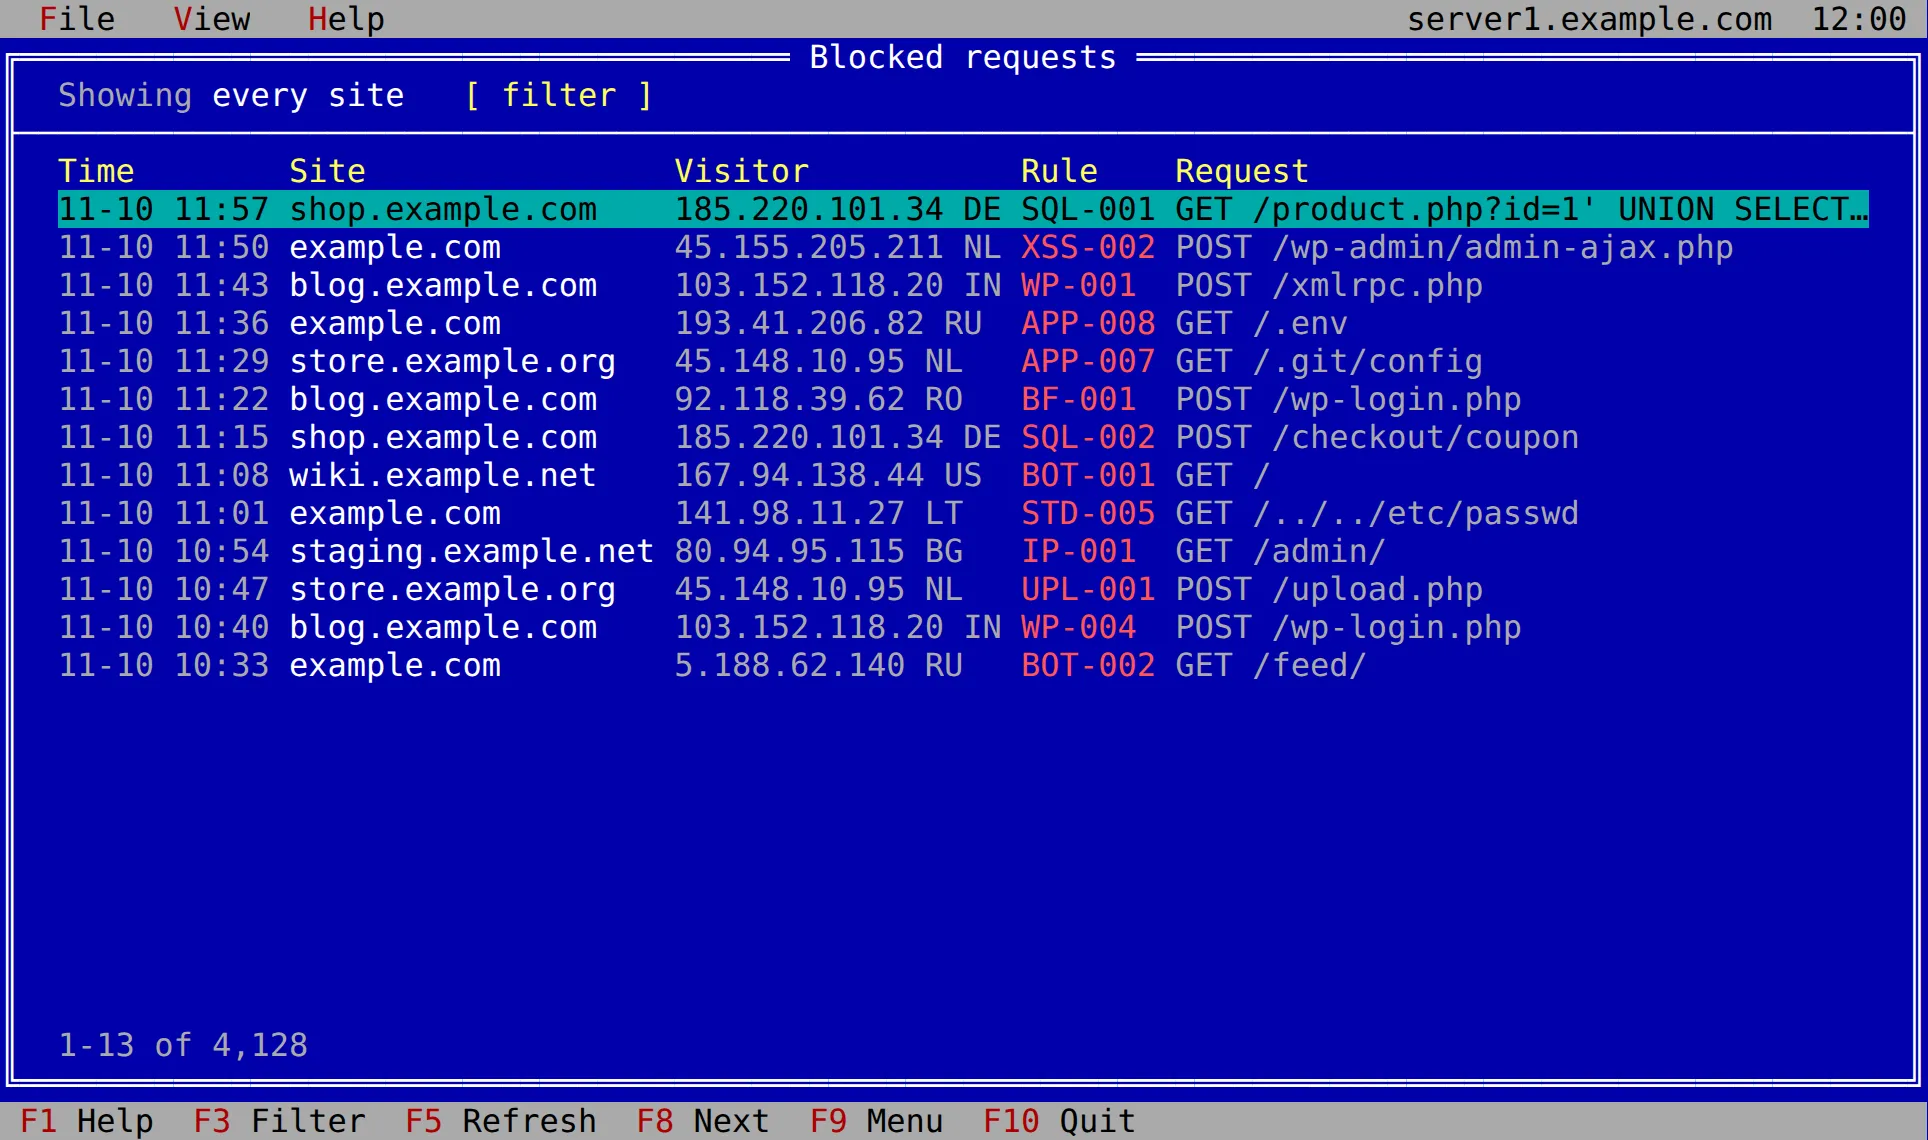
Blocked requests lists every request the WAF stopped, newest first, 100 at a time. F7 and F8 go to the previous and the next page.
F3 filters the list by site, visitor IP, rule (such as SQL-001) or country (a two-letter code, such as US); F4 shows everything again. The filter matches exact values.
Enter — or a double click — opens a request: the site, the visitor and its country, the rule that blocked it, the request line, its headers and the start of its body. Esc or F3 go back to the list.
Allowing a false positive
When a legitimate request was blocked — a plugin saving its settings, an API call, an upload of your own — open it and press F2:
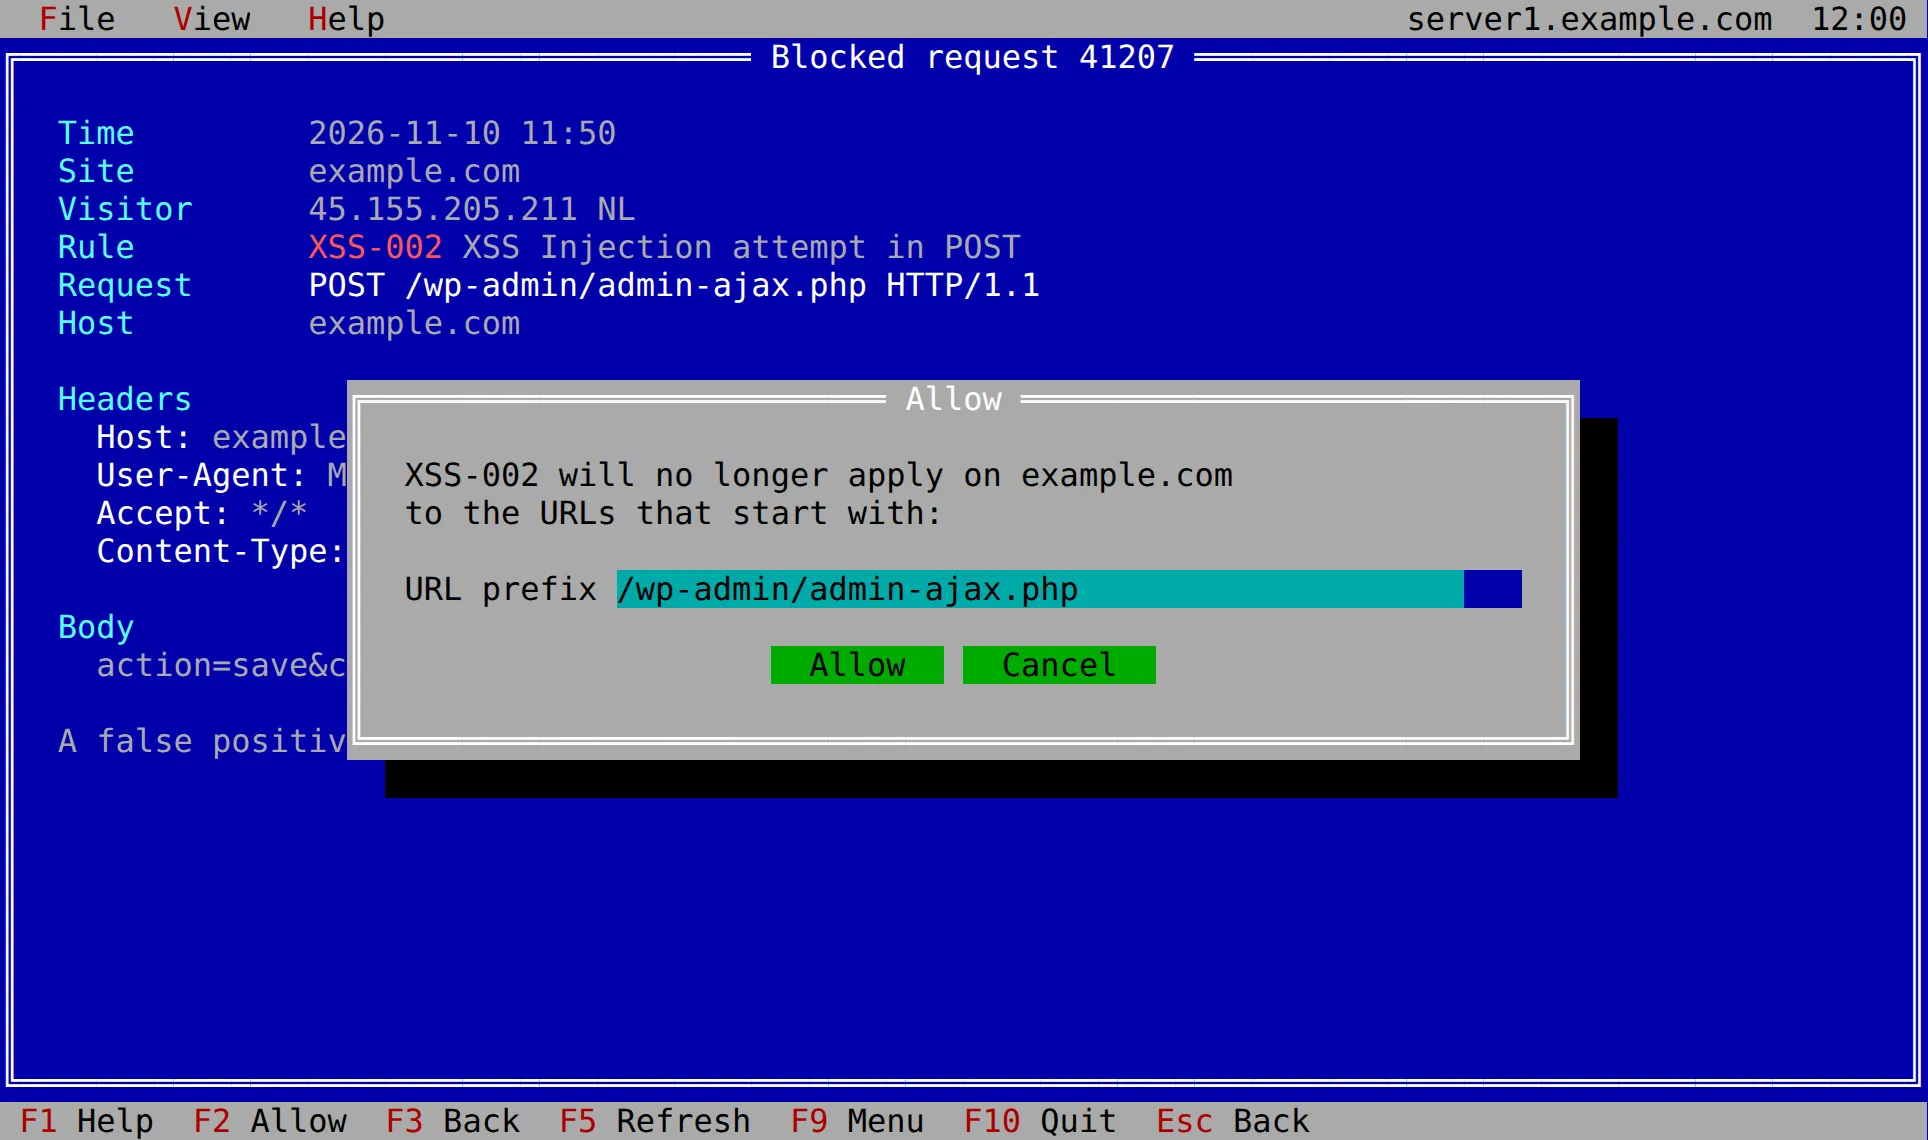
The dialog proposes the path of the request, without its query string. Leave it, or shorten it to cover more URLs (for example /wp-admin/ instead of /wp-admin/admin-ajax.php), and press Allow. From then on, that rule does not apply to the URLs of that site that start with the prefix; every other rule still does, and the rule still applies to the rest of the site and to every other site.
This adds an exclusion, which you can review or remove later in the Exclusions tab of the site. See WAF Exceptions for how exclusions work.
Sites
Sites lists the websites pxShield protects. It finds them in the configuration of the web server (nginx, Apache or Caddy); www.example.com and example.com are one site. The Rules column says modified when the site has rules that differ from the defaults.
After you add a website to the web server, reload the web server: pxShield picks it up. Enter opens a site.
A site opens in five tabs. Tab (or F6) goes to the next one, Shift+Tab to the previous one, and a click on a tab opens it. Changes to a site apply within a minute; the service does not need a restart.
Rules
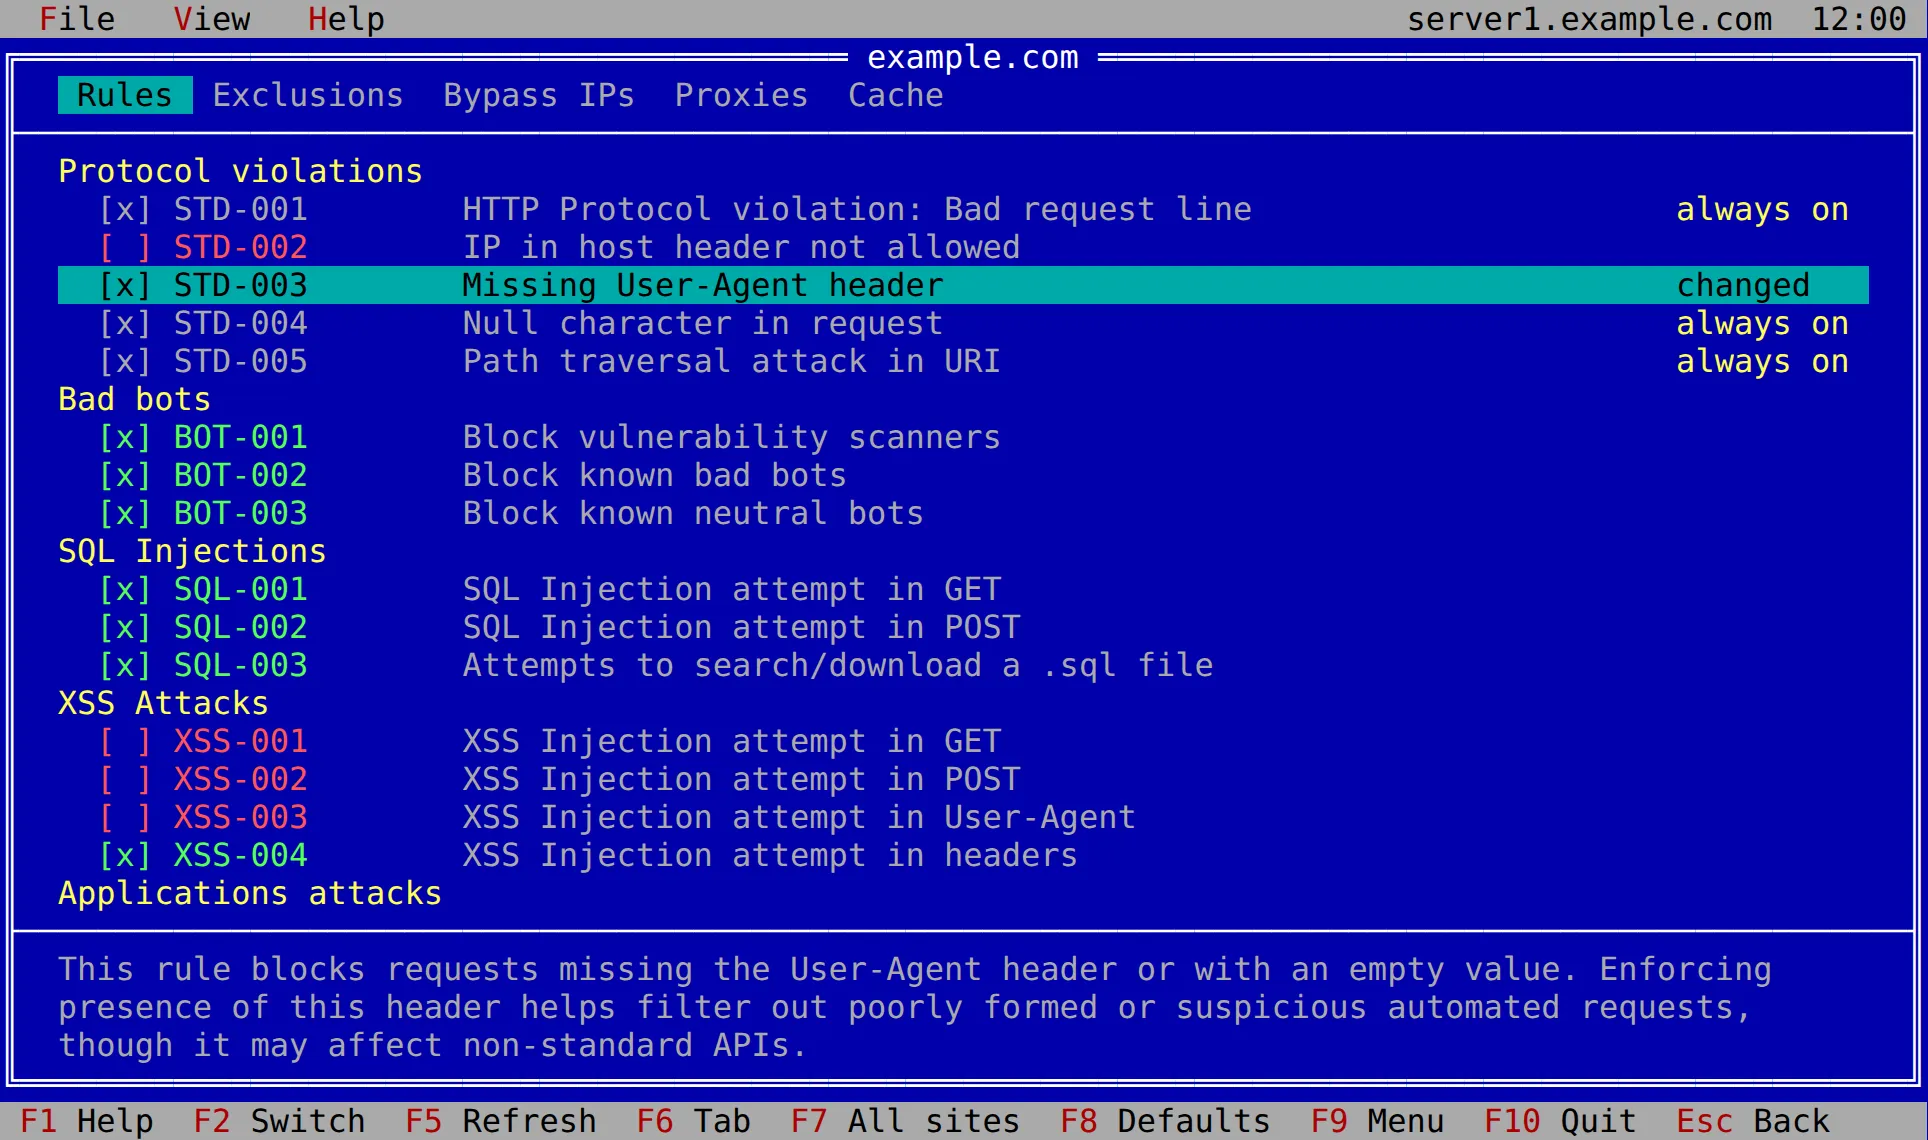
Every rule of the WAF, grouped by what it protects against. [x] is on, [ ] is off. The panel at the bottom explains the rule under the bar.
| Key | What it does |
|---|---|
Space, Enter or F2 |
Switches the rule under the bar on or off. Switching it off asks first |
F7 |
Gives the rule under the bar the same state on every site (it asks first) |
F8 |
Puts every rule of the site back to its default (it asks first). Rules you switched on are switched off again |
changed marks a rule whose state differs from its default. always on marks a rule that protects the server itself, such as the one against malformed requests: it cannot be switched off.
Exclusions
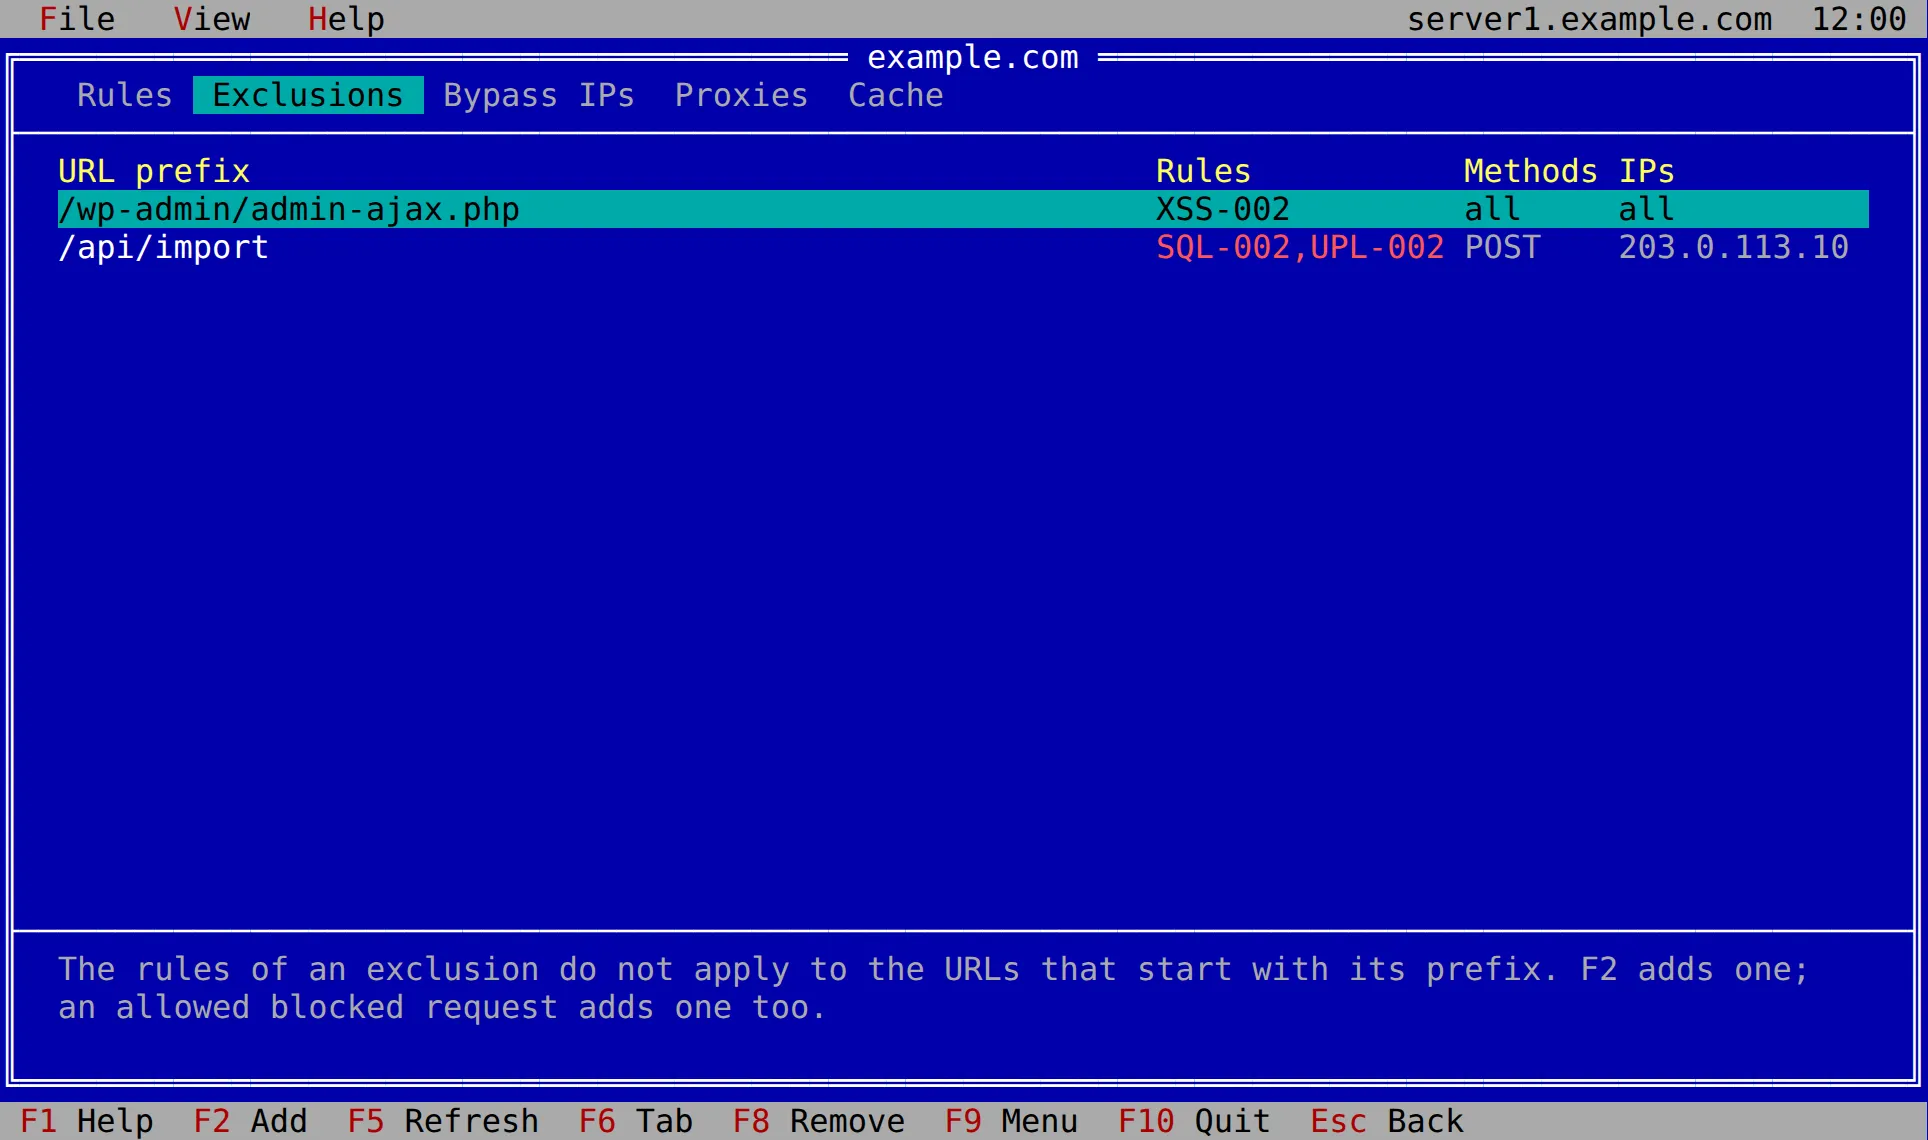
The exclusions of the site: the rules that do not apply to the URLs that start with a prefix. An exclusion can also be limited to some HTTP methods or some visitor IPs.
F2adds one. Give the URL prefix (it starts with/), the rule ids separated by commas (XSS-002,SQL-002), and optionally the methods (POST) and the IPs (exact addresses, not ranges). Leave methods and IPs empty to match all of them.F8orDeleteremoves the exclusion under the bar (it asks first).
Bypass IPs
IP addresses or CIDR ranges (203.0.113.0/24) that skip every WAF rule on this site. Use it for your own office, a monitoring service or a trusted integration, never for visitors. F2 adds one, F8 or Delete removes the one under the bar.
The IPs of the server-wide bypass also skip the WAF on every site.
Proxies
When a site is behind a reverse proxy — a CDN, a load balancer — every request comes from the proxy, not from the visitor. List the proxy here and the WAF takes the visitor IP from the X-Forwarded-For header of the requests that come from it, so the WAF and the Blocked requests screen see the real visitor.
F2adds a proxy (an IP or a CIDR range),F8orDeleteremoves the one under the bar.F4sets Cloudflare for this site: as the server (the default), on or off. On trusts the Cloudflare edges as proxies of this site; off stops trusting them, for a site that is not behind Cloudflare even if the server says so.
The panel at the bottom shows the proxies trusted for the whole server, which apply to this site too.
Cache
The cache settings of the site:
- Pages: off; manual; or wordpress, where the Pyxsoft WordPress plugin says which pages may be cached.
- WebP, Minify JS, Minify CSS: on, off, or default, which follows the server.
F2 or Enter changes them. F4 purges one URL, or every URL that starts with a prefix when it ends in * (/blog/*). F7 purges the whole cache of the site (it asks first).
The cache only works when its engine is enabled in /etc/pxshield.ini (CacheStaticFiles, CacheDynamicFiles); both are off by default.
Server
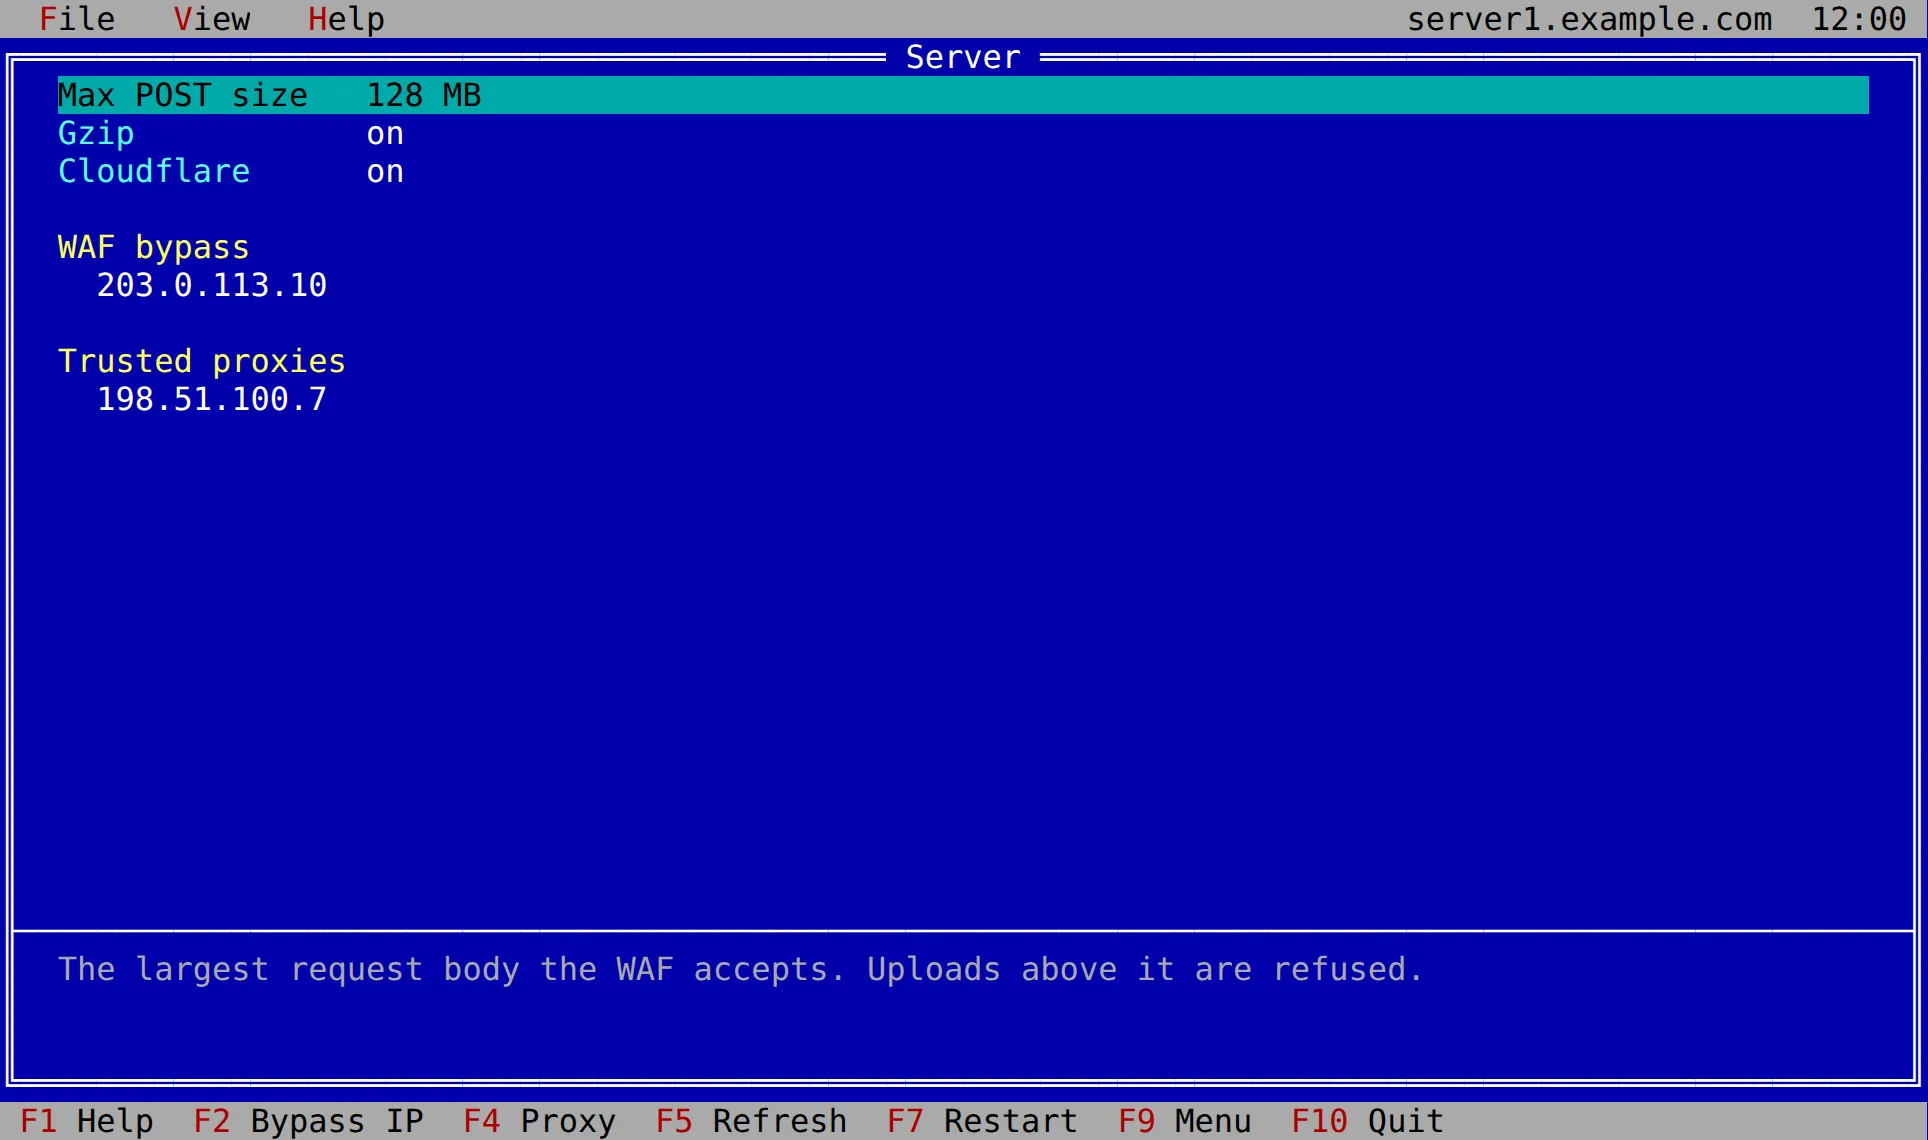
The settings of the whole server:
| Setting | What it is | When it applies |
|---|---|---|
| Max POST size | The largest request body the WAF accepts, from 1 to 2048 MB. Larger uploads are refused | After a restart |
| Gzip | Compresses the answers on the fly | After a restart |
| Cloudflare | Trusts the Cloudflare edges as proxies on every site that does not say otherwise | Right away |
| WAF bypass | IPs and ranges that skip every WAF rule on every site | After a restart |
| Trusted proxies | Reverse proxies of every site (see Proxies) | Right away |
Enter changes the setting under the bar. F2 adds a bypass IP, F4 a trusted proxy, and F8 or Delete removes the IP under the bar.
F7 restarts the service, which applies the settings marked after a restart. While one of them is waiting, the panel at the bottom and the Summary say so. A restart cuts the connections in progress for a moment, so do it at a quiet time.
License
License shows whether the license is valid, until when, its code (only its last characters) and its holder.
F2sets a license code. It is typed hidden, so it does not show on a shared screen.F3starts the free trial, when the server can still use one.
Working alongside WHM
On a server with cPanel, the WHM plugin and this interface change the same settings. Each change re-reads the current settings just before saving, so a change made from WHM a moment earlier is not overwritten. If both are open, F5 shows the latest state.
Terminal tips
- The interface draws its frames with line characters even when the locale of the server is
C, as on a minimal VPS. If your terminal shows them wrong, runPXSHIELD_ASCII=1 pxshieldto draw them with plain ASCII. - Without a terminal — from cron, a script or a pipe —
pxshieldwithout arguments prints its usage instead of opening the interface. Every action of the interface is also a command for scripts: see Command Line. - Text that comes from visitors (URLs, headers, bodies) is shown with its control characters escaped (
\x1b), so a crafted request cannot change your terminal.
Troubleshooting
pxshield: it must run as root — run it as root, or with sudo pxshield.
the pxshield service is not running — start it with systemctl start pxshield; journalctl -u pxshield shows why it stopped.
something that is not the pxshield service listens on its RPC port — pxshield talks to the service on 127.0.0.1:2987, and it only talks to it when the program listening there belongs to root, as the pxShield service does. Another program, run by another user, was listening on that port, so nothing was sent to it. Find it with ss -ltnp 'sport = :2987', stop it, and start pxShield.
A site is missing from Sites — pxShield reads the sites from the configuration of the web server. Check that the site is enabled there and reload the web server (systemctl reload nginx, apache2, httpd or caddy); pxShield picks up the change.
This page is also available as markdown.